|
 A top grade Pacific Yew stave
|
|
|
|
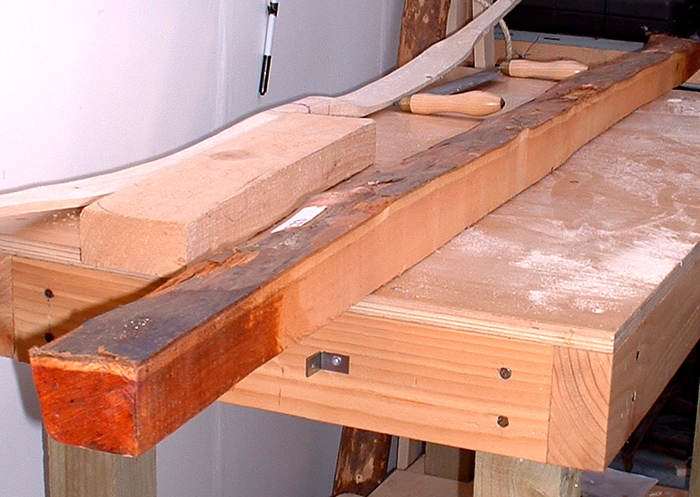
My workshop is
a fairly simple affair as apart from an electric
drill (to drill the tough buffalo horn) the process
of making self wood longbows uses no power tools.
Top quality staves arrive as shown above, being well
seasoned and ready to work.
|
The first stage of the longbow making process is an
examination of the stave, checking the moisture levels, checking the grain and
structure of the wood, deducing the character of the stave and obviously looking
for any visible defects or possible problem areas. Deciding on the basic shape of the intended longbow and how it sits within the
body of the stave depends on many factors such as the draw weight, draw length
and whether the bow will bend in the handle or not.
The average weight of a Pacific Yew
stave is about 10lb and the average weight of a finished bow is about 1 1/2 lb,
so the whole shaping process involves about 80% of the wood being removed from the
stave.
|
|
|
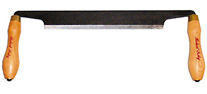
Initial shaping is done using a draw knife, basically a large,
very sharp blade with a handle on each end. This is a wonderful shaping tool but
its use leaves no room for error and take a long time to master. Even at this
early stage wood removal can not be rushed. In this first stage of shaping about
2 lb of wood is removed and this is followed by another thorough examination of
the stave.
It is at this
point that I remove the bark. The bark does not separate easily,
and great care must be taken to remove it without cutting
into the wood beneath. Once the back of the stave is
revealed I draw a centre line and the rough outline of the intended
longbow to act as a guide for the next stage of shaping.
The next stage of making the longbow is to remove another
approx 4 lb of wood, which starts to reveal the rough shape and proportions of the
longbow in the stave. At this point the wood is still too thick to bend.
|
|
|
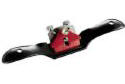
Continuing the bow making process I now switch from the draw
knife to the spoke shave. This tool is basically a small bladed plane that
can follow the contours in the wood and allow very precise removal, particularly
on a rounded surface.
Working from the
middle towards the tips the shaping continues until a point
is reached where you can start 'floor tillering'. This means
that when holding the bow with one hand at the top and one
hand on the middle it is possible to exert enough pressure
to bend the bow against the floor. This process is repeated
many times during the continuing shaping of the longbow.
|
|
|
Shaping and floor
tillering continues with the spoke shave until it is time to
start proper tillering. Tillering is basically the process
of creating the required bending shape in the wood when the
bow is pulled. It involves holding the bows handle area on a
fixed platform and then using a rope and pulley to hook on
the bows string allowing you to pull the bow from a distance
and judge the bend with your eyes while at the same time
measuring the draw weight and distance. It is done in two
main stages, the first is done using a loose string and
before the horn nocks are attached, secondly is with the
horn nocks attached and with the bows proper string in
place.
This first stage of
tillering also incorporates the final shaping of the bow.
This involves refining the unique D shaped cross section,
final shaping of the handle area,( if it has a stiff handle)
and preparing the tips of the bow for the buffalo horn
nocks. Again, the spoke shave is the most often used tool
but at this point I will also start to use cabinet
scrapers for an even finer cut. A fine wood file
is also used for the handle area and in preparing the
bows tips.
This stage of the bow
making process is the most crucial part and takes many days
to complete, at the end of which the bow has its final
overall shape and a nice smooth action with an even balanced
bend.
|
|
|
Before the second and
final phase of tillering can begin I have to make the bows
horn nocks and attach them and the bows string. Buffalo horn
is strong, light and very tough and like a very dense wood
it has a ringed grain structure that runs up the length of
the horn.
Two rough blanks
are cut from a buffalo horns tip and drilled to the required
diameter in one end. Having decided on the basic shape the
blanks are roughly shaped using a variety of files and sandpaper.
Once glued into place the nocks are filed to their final
shape and then polished with a fine
metal polish to produce a high gloss finish.
The bow string is made
from 12 -16 strands of B50 bow string material wound into a
two cord reverse twist string. One end of the string has a
'never ending' style loop while the other ends loop is
formed by wrapping the string around the nock and plating it
back into the string and then binding it tight. Getting the
length right, allowing for a degree of initial stretching,
is determined by the brace height. Brace height is the
distance between the string and the bow and for these
longbows should be 5 1/2 - 6 inches. A Flemish loop type
string is also available, made from Dacron or 'Fast
Flight'.
|
|
|
Now the nocks are
attached and the string is on I have a true representation
of the bows tiller and can begin the second and final stage
of tillering. This basically involves final adjustments to
the tiller and the fine finishing of the wood. These are
both done
using cabinet scrappers, a fine wood file and a range of fine sandpapers.
The draw weight of
the bow is constantly checked during the manufacturing
process but now that the woodworking
of the bow is finished it is possible to measure the bows
final draw weight at its maximum draw length. This is done by measuring the weight
needed to pull the string a specified distance from the bow.
With these longbows that distance is generally 28 inches and
that distance will be the maximum recommended distance to
pull the bow. Safe, higher draw lengths are achievable with
Yew by making the bow longer but for most people 28 inches
is plenty.
The next stage is the
application of three coats of Danish oil to the wood. This
is applied over several days with a light sand after the
second coat. Once the oil is dry I can go on to the final
stage of the bow making process, making the hand grip.
Our English longbows
are fitted with my own distinct style of hand grip, made
from a spiralled strip of calf leather and two lengths of
solid silver wire. Once the leather grip has been glued on
the silver wire (5 feet in total) is tightly wound around
each end and fixed into place.
|
|
|
Though this is only really a rough guide
to the bow making process, as each stave is different as is
each new longbow it produces, hopefully it covers the
basics. If anyone has any questions I would be happy to try
and answer them.
With the longbow now
completely finished it gets tested for for consistancy and
action by shooting three different
weighted arrows over various distances. It also has its
arrow speed tested using the chronometer, the results
being given in feet per second and a points above weight
efficincy rating.
The individual and
unique character of each new longbow is only briefly
glimpsed during these first test shots and it is with some
regret that I pass that learning pleasure on to another.
|
|
 |
| |